A clean vape tank supports better flavor, steadier airflow, and more dependable device performance. Learning how to clean a vape tank properly also helps users notice worn seals, damaged glass, or residue before these problems become serious. The process is simple, but small details matter. A tank can look spotless while leaving a faint sweet film around the chimney or threading.
Phil Busardo, a longtime vaping hardware reviewer, emphasizes a practical principle: “Clean equipment is part of responsible vaping.” His advice reflects real maintenance experience. Disassemble the tank completely, then separate the glass, coil, seals, base, and mouthpiece. Rinse reusable parts with warm water. Avoid boiling water, harsh chemicals, and abrasive brushes. They may weaken seals or scratch surfaces. Dry each component with a lint-free cloth, then allow it to air-dry fully.
Do not rush this step.
A damp chimney can dilute e-liquid and create an unpleasant, muted taste. Replace a coil when it tastes burnt, remains flooded, or shows heavy buildup. Never wash and reuse a disposable or damaged component. Cleaning also cannot correct every problem. A cracked tank, loose seal, or contaminated e-liquid requires replacement. That is easy to overlook.
This guide focuses on safe, lawful device care rather than encouraging nicotine use. It recommends following the manufacturer’s instructions and checking local requirements. Even experienced users can miss residue beneath an O-ring. Careful inspection remains essential. No cleaning routine is perfect, but a slower, methodical approach usually produces a cleaner tank and fewer avoidable problems.
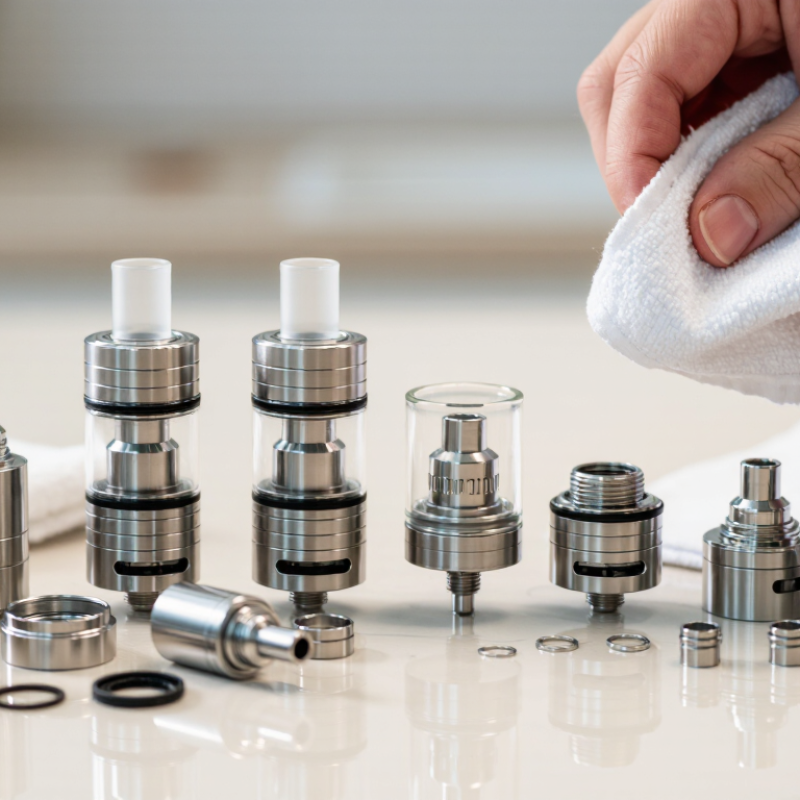
A vape tank is the small chamber that holds e-liquid and connects to the heating coil. It usually contains a glass or metal tube, a base, seals, and a mouthpiece. The coil warms the liquid, while the tank controls how that liquid reaches the coil. Understanding these parts makes cleaning less careless.
Residue can collect around the threads, airflow holes, and mouthpiece. Over time, it may cause a stale taste, weak airflow, or small leaks. Regular cleaning also helps you notice cracked glass, loose seals, or damaged parts before they become bigger problems. I usually empty the tank, separate its removable pieces, and rinse them with warm water. A soft cotton swab helps reach narrow threads. Avoid soaking electrical components. Let every part dry completely before reassembly. Moisture trapped inside can affect performance.
I once reassembled a tank too quickly. The remaining water diluted the next refill and changed its flavor. That mistake was avoidable. I now leave the parts on a clean towel for several hours. Some tanks need manufacturer-specific care, so the device instructions still matter. Replace worn seals and damaged glass instead of forcing them back into place. Clean gently. Over-scrubbing can damage delicate threads or seals. A clean tank does not fix every problem, but it makes troubleshooting clearer and use more consistent.
Prepare nitrile gloves, clean paper towels, cotton swabs, a small glass bowl, and warm water. A soft microfiber cloth helps remove hidden moisture around the threading. Keep a flashlight nearby. It makes residue easier to spot.
Remove the tank from its battery before cleaning. Empty all liquid, then separate the glass, mouthpiece, seals, and coil when possible. Rinse washable glass and metal parts with warm water. Do not soak the battery connection. Avoid sharp tools, boiling water, and compressed air. Isopropyl alcohol may damage plastic or rubber seals, so I avoid it inside the tank. A replacement coil is usually safer than trying to wash one. Let every part air-dry completely, preferably overnight.
Safety deserves attention beyond taste and performance. A U.S. Fire Administration report documented 195 electronic-cigarette fires and explosions between 2009 and 2016, including 133 injuries. Moisture near electrical contacts is an unnecessary risk. The 2024 National Youth Tobacco Survey also reported 1.63 million U.S. middle and high school students used e-cigarettes. Store cleaning supplies and devices away from children. I once rushed reassembly after rinsing, and the tank leaked. That mistake showed me that “looks dry” is not a reliable test. Check the seals, inspect the glass for cracks, and wipe the connection before use.
Before cleaning a vape tank, switch off the device and let it cool completely. Remove the tank from the battery section with clean, dry hands. I usually place a paper towel underneath it because small drops can escape unexpectedly. Do not pour leftover e-liquid into a sink. Transfer it into a sealed container and follow local disposal guidance.
Empty the tank by holding it upside down over a suitable container. Unscrew the mouthpiece, then remove the base and coil only if the manufacturer’s instructions allow it. Some tanks contain delicate seals that look loose but are essential. Never force a stuck part.
A soft cloth can improve grip, though I once tightened a base too much and damaged its threading. That mistake taught me to use gentle, even pressure.
Rinse removable glass and metal parts with warm water, not boiling water. Keep electronic sections and fixed wiring completely dry. Wash each piece separately, checking the airflow holes for residue. Pat everything with a lint-free cloth, then leave the parts to air-dry for several hours. The coil may retain old liquid and flavours, so replacing it is often more reliable than rinsing it. Before reassembly, inspect the seals for cuts and confirm every part is fully dry. A rushed rebuild can cause leaking.
Top Tips on How to Clean a Vape Tank Properly?
Cleaning a vape tank starts with disassembly and patience. The U.S. Food and Drug Administration describes these devices as systems containing a liquid reservoir, heating element, and battery-powered parts. That distinction matters. Remove the tank from the battery before cleaning. Never rinse the battery, electronic connector, or heating coil. I once soaked a coil by mistake. It looked clean, but the wick tasted burnt afterward.
Wash the glass section, mouthpiece, metal base, and silicone seals separately. Use warm water and a small amount of mild, unscented soap for sticky residue. A soft cotton swab can reach the threading. Do not use boiling water; sudden heat may damage glass or deform seals. Rinse every washable part under running water until no slippery film remains. The mouthpiece deserves extra attention because it touches your lips. The World Health Organization’s 2023 report on electronic nicotine delivery systems also highlights the importance of preventing contact between liquids and electronic components.
Drying is not a rushed step. Shake off droplets, then place each part on a clean, lint-free towel. Leave the tank open for several hours, preferably overnight. Check the threading and seal grooves carefully. Any trapped water can dilute the liquid or cause poor airflow. A 2024 waste report from the Material Focus initiative found that millions of disposable vaping devices are discarded in the United Kingdom each week, reinforcing the value of maintaining reusable hardware. Still, cleaning cannot restore a worn coil. Replace damaged seals or coils instead of forcing another refill.
After cleaning a vape tank, reassembly deserves careful attention. Turn the device off and remove its battery or power source. Let every tank part dry completely, especially the chimney and airflow openings. Even a small water drop can dilute the e-liquid or affect the draw. Check the glass, seals, and threads for cracks or trapped debris. Replace damaged parts according to the manufacturer’s instructions.
Tip: Reassemble gently, not forcefully. Seat each seal evenly, then tighten the tank until it feels secure. Over-tightening can flatten the seals and create leaks. I once rushed this step and blamed the coil for a loose seal. That mistake was avoidable. Install the coil firmly, but do not twist it aggressively.
Prime the coil with the recommended e-liquid, then fill the tank without exceeding its marked limit. Wait several minutes so the internal material absorbs the liquid. A little patience helps. Set the device to a low power level before testing. Take a few gentle draws without activating the device, if the design allows it. Then take a short powered test. Stop immediately if you notice a burnt taste, gurgling, unusual heat, or leaking. Wipe the base with a dry tissue and inspect the connection. If performance still seems wrong, let the tank rest and review the assembly instead of increasing power blindly.
Follow the sequence below to disassemble, rinse, dry, reassemble, prime, and test a vape tank safely. Remove the tank from the battery before cleaning, and never immerse the battery or electronic components in water.
The chart shows practical minimum time estimates. Rinse removable tank parts with warm water, allow them to air-dry completely before reassembly, then fill the tank and wait about 5–10 minutes so the coil can absorb e-liquid. If the tank leaks, tastes burnt, or produces uneven vapor, stop using it and inspect the seals and coil.
A vape tank is a small chamber that holds e-liquid. It connects to a heating coil. Common parts include glass, seals, a base, and a mouthpiece.
Residue can collect around threads, airflow holes, and the mouthpiece. This may cause stale flavor, weak airflow, or small leaks. Cleaning also reveals cracks and loose seals.
Empty the tank and separate its removable parts. Rinse them with warm water. Use a soft cotton swab for narrow threads. Avoid soaking electrical components.
Let every part dry completely before reassembly. Several hours on a clean towel can help. Moisture inside may dilute e-liquid or affect performance.
Check the glass, seals, threads, and airflow openings. Look for cracks, trapped debris, or uneven seals. Replace damaged parts instead of forcing them into place.
Seat each seal evenly and tighten the tank gently. Over-tightening can flatten seals and create leaks. Install the coil firmly, but avoid aggressive twisting.
Add the recommended e-liquid to the coil. Fill the tank below its marked limit. Wait several minutes for absorption. Start at low power and take a short test.
Stop using it immediately. Check for moisture, damaged seals, loose connections, or incorrect assembly. Wipe the base with a dry tissue. Increasing power blindly is a bad idea. I have made that mistake.
Learning how to clean a vape tank properly helps maintain a cleaner taste, smoother performance, and more consistent vapor production. A vape tank holds e-liquid and usually includes a glass or metal chamber, coil, mouthpiece, seals, and base. Over time, residue can build up and affect flavor, airflow, and the condition of the components. Before cleaning, gather warm water, a small bowl, paper towels or a lint-free cloth, and a soft brush or cotton swab. Turn off the device, remove the tank, empty any remaining e-liquid, and carefully disassemble the parts according to their connections.
Wash the removable components with warm water, avoiding unnecessary moisture around electrical sections. Rinse each part thoroughly and inspect it for residue, damage, or worn seals. Allow everything to air-dry completely before reassembly, since trapped moisture can affect performance. Reattach the components securely, install a suitable coil if needed, add e-liquid, and let the coil absorb it before testing. Regular cleaning and careful handling can extend the tank’s useful life and preserve a fresh, reliable experience.

Lush Vape