Learning how to prime a vape coil for the first time is a small step with practical consequences. A dry coil can produce a harsh, burnt taste within seconds. Proper preparation helps the wick absorb e-liquid before heating begins. It also makes the first few draws smoother and more consistent.
This matters because vaping devices are widely used, yet their operation is often poorly explained. The CDC’s 2023 National Youth Tobacco Survey reported that about 2.13 million U.S. middle and high school students currently used e-cigarettes. That figure does not prove that every device is used incorrectly. It does show why clear, responsible guidance matters. The National Academies of Sciences, Engineering, and Medicine also concluded that e-cigarette aerosol can contain potentially harmful substances. Safer handling should never be confused with harmless use.
This guide explains how to prime a vape coil for the first time using simple, observable steps. You will learn where to place e-liquid, how long to wait, and why low-power testing matters. Picture the wick as a small cotton sponge inside the coil. It needs time to become evenly saturated. Do not rush it.
A cautious approach is better. Check the manufacturer’s instructions first, because coil designs vary. Use only compatible e-liquid and avoid touching heated metal. If the coil tastes burnt, stop using it. My own early mistake was assuming a full tank meant a ready coil. It did not. A short pause often prevents an unpleasant first draw and unnecessary coil replacement.
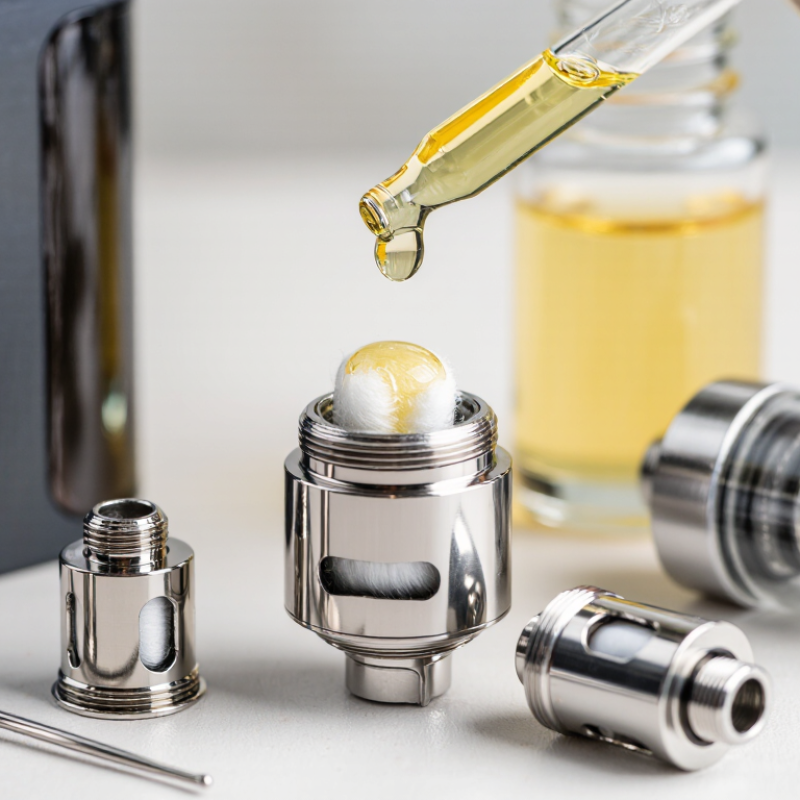
Before priming a vape coil, identify its resistance, construction, and recommended wattage. The resistance is usually printed on the coil body, such as 0.4Ω or 1.2Ω. Lower resistance coils generally need more power, while higher resistance coils need less. Check whether the coil is made for direct-lung or mouth-to-lung use. Mesh coils heat quickly and evenly, but they can still burn when used too aggressively. The manufacturer’s wattage range is the safest starting point. Begin near the lower number, not the middle.
The National Academies of Sciences, Engineering, and Medicine reported that aerosol emissions change with device settings, coil temperature, and user behavior. CORESTA technical guidance also treats resistance, power, and temperature as connected variables. These findings make the printed wattage range important, not decorative. Add e-liquid to the visible cotton ports, then wait several minutes. I prefer five to ten minutes. A few unpowered draws may help saturate the wick, though this step is not always necessary. Fit the coil firmly, check for leaks, and take short puffs at low power. The flavor should taste clean, not sharp or dry. If the coil crackles violently, tastes burnt, or heats unusually fast, stop and recheck the resistance and wattage. I once trusted a familiar setting too quickly. That was careless. Coil labels can be small, and some readings may fluctuate slightly, so inspect them again before use.
Identify the coil resistance, coil type, and the manufacturer’s recommended wattage range before vaping. The chart shows typical wattage ranges for common coil categories; always follow the wattage printed on the specific coil.
To prime a new coil, apply a few drops of e-liquid to the exposed cotton, fill the tank, and wait several minutes for the liquid to soak in. Start at the lower end of the recommended wattage range and increase gradually. A higher-resistance coil generally uses less power, while a lower-resistance coil usually requires more power.
Prime exposed cotton with 5–10 drops of compatible e-liquid. Place one drop on each visible cotton opening, then add a few drops down the coil’s center. The cotton should look evenly damp, not flooded. Use the liquid’s recommended viscosity for your device. A thicker liquid may travel slowly through small channels. Wait at least 5–10 minutes after filling the tank, allowing the cotton to absorb fully.
Start at the lower end of the coil’s suggested wattage. Take two or three gentle, unpowered draws if the device allows it. Then use short puffs and increase power gradually. Research published in Environmental Science & Technology found that overheating conditions can sharply increase carbonyl emissions, especially during dry or poorly supplied wicking. CORESTA laboratory guidance also stresses controlled liquid delivery and repeatable testing, although it does not establish one universal drop count. Five to ten drops is practical, not a laboratory law.
I used to add extra liquid for safety. That caused gurgling and occasional leakage. Less can be better. Check for a harsh taste, reduced vapor, or a hot metal sensation; these signs suggest inadequate saturation or excessive power. The 2023 U.S. National Youth Tobacco Survey recorded more than two million current youth e-cigarette users, reinforcing why responsible, age-appropriate handling and manufacturer instructions matter. Never use an unknown liquid or a damaged coil.
A new coil contains dry wicking material, so filling the tank is only part of the process. After installing it, fill the tank carefully and check that the liquid reaches the coil openings. Do not rush the next step. Leave the filled tank upright for 5–15 minutes, allowing the wick to absorb the liquid completely. Thicker e-liquid may need the full 15 minutes.
Watch the wick.
During this waiting period, keep the device still and avoid repeated button presses. If the coil design allows it, adding a few drops directly onto the exposed wick can help, but follow the coil manufacturer’s instructions. Too much liquid may cause gurgling or leaking. I once started vaping after only three minutes and noticed a dry, sharp taste almost immediately. Waiting longer would have prevented that mistake.
After saturation, set the device to the lower end of the coil’s recommended power range. Take two or three gentle puffs without inhaling deeply, then increase power slowly if needed. A smooth sound and clean flavor usually suggest proper saturation. Harshness, weak vapor, or a burnt smell means the wick may still be dry or damaged. Stop using it and inspect the tank before continuing. Personal experience helps, but the printed coil guidance remains the safer reference.
Priming a new vape coil helps prevent dry hits and uneven heating. Add e-liquid slowly through the visible cotton openings. Avoid flooding the center airflow tube. After filling the tank, let the coil rest for five to ten minutes. This waiting period allows the liquid to soak into the cotton fully. I once rushed this step and noticed a harsh, burnt taste immediately. It was a small mistake, but the coil never recovered.
Check the coil’s printed wattage range before pressing the button. If the range begins at 20 W, start around 5–10 W. That is 10–15 W below the lower rated point. Take a few gentle puffs without inhaling deeply. Then increase power by one or two watts at a time. Pause after each adjustment and watch for changes in flavor, vapor, and warmth. Stop if the vapor feels dry, sharp, or unusually hot. Never exceed the recommended maximum.
Tips: Keep the tank above the coil’s liquid openings. Use short puffs while the cotton settles. Do not chain-vape during the first few minutes. If the flavor remains burnt, replace the coil instead of raising power. Battery safety also matters, so use a compatible device and inspect it for damage. Wattage advice can vary slightly between coils, and that is worth checking.
Priming a new vape coil helps prevent burnt flavor and uneven vapor. I begin by checking the coil for damaged cotton, loose parts, or visible cracks. I add e-liquid slowly through the coil openings, avoiding the central airflow tube. The cotton should look fully damp, not flooded. Then I install the coil securely and fill the tank according to the device instructions.
I wait about 10 minutes before vaping. This gives the liquid time to reach the inner cotton. I take two or three gentle draws without activating the device, if its design allows it. After that, I use the lowest recommended power setting. The first few puffs should be short and soft. Do not chase thick clouds immediately.
Flavor is the clearest warning sign. A clean taste suggests the coil is wet enough, while a harsh, dry taste means I should stop and wait longer. Vapor should build gradually, without popping or excessive heat. I also inspect the base and mouthpiece for fresh leakage. A small amount of condensation can be normal, but steady dripping needs attention. I once increased the power too quickly and damaged a new coil, so I now raise it in small steps. Check everything before normal coil operation.
Read the resistance printed on the coil, such as 0.4Ω or 1.2Ω. Check its construction and intended inhalation style. Use the printed wattage range. Start near the lower number.
Add five to ten drops to the visible cotton openings. Place one drop on each opening. Add a few drops inside the coil. The cotton should look damp, not flooded.
Wait at least five to ten minutes after filling the tank. This allows the liquid to reach the inner cotton. Longer may help with thicker liquid.
Two or three gentle draws may help saturate the wick. Use this step only if the device allows it. Do not force airflow.
Begin at the lowest recommended wattage. Take short, gentle puffs. Increase power in small steps. Do not chase large clouds immediately.
Clean flavor usually suggests adequate saturation. Vapor should build gradually. The device should not feel unusually hot. Small crackling sounds may occur, but violent popping needs attention.
Stop if the taste becomes harsh, dry, or burnt. Also stop after unusual heat, reduced vapor, or persistent leakage. Recheck the coil and power setting.
Not always. Too much liquid can cause gurgling and leakage. I once added extra liquid for safety. That choice made the problem worse. Less can be better.
Learning how to prime a vape coil for the first time helps prevent dry hits, burnt cotton, and uneven performance. Begin by checking the coil’s resistance, coil type, and recommended wattage range. Add 5–10 drops of compatible e-liquid directly onto any visible cotton openings, taking care not to oversaturate the coil. Then fill the tank and let it sit upright for 5–15 minutes, allowing the e-liquid to fully soak into the wick.
When ready, set the device to a wattage 10–15 watts below the coil’s rated range and take a few gentle draws while increasing the power gradually. Pay attention to the flavor, vapor production, and any signs of leakage or gurgling. If the vapor tastes burnt, the draw feels unusually dry, or liquid leaks from the tank, stop and check the coil installation and saturation before continuing. Once performance is smooth and consistent, use the coil within its recommended wattage range.

Lush Vape